Saturday, December 14, 2013

A peek at bathroom progress


The bathroom is still very much a work in progress. Some of you will remember the dilemma I had about the gold shower unit-brass bathtub combination  -  together there was just too much 'gold' going on... I think they look much better now that the shower/tap unit is painted a dull pewter. 


The toilet seat and base have been repainted grey. I think the softer colour suits the room better. It's also been moved to the opposite corner as a trial (everything is held in place with tacky wax until I'm sure about the relocation). 


This corner is almost invisible from the window, which is the only way it'll be possible to see into the room at all soon. I don't think that really matters because the toilet isn't the most interesting/attractive thing in a bathroom anyway and if it's moved I can put a chair at the end of the bath and maybe stack it with towels. If you have an opinion on the relocation please feel free to share it, I'm always interested in, and appreciate, other viewpoints. (The cabinet can't be moved any further to the right because the door opens back into that space.)


The cabinet can be seen through the window so it's worth dressing it up a little. It's made from cardboard, except for the the top which is basswood with a circle cut into it so that the bowl (which was stolen from the kitchen) could be recessed into it, just the rim sits above the counter. The taps (which were ripped out of a kitchen sink unit) have been aged a little by dabbing on some matt pewter paint with a fine brush. The drain is made the same way as in the kitchen sink, it's the flat half of an eyelet set glued on. The middle is painted black, allowed to dry and then a good dollop of PVA is put on top of that. When it dries it's translucent and looks like a little water is trapped there.  The staining on the wall is strong tea brushed on liberally, it runs down and gathers in the crevice at the top of the little board at the back so that it looks like this has been a problem area for the cleaner for a very long time! 

The pink canister is by Mercedes (Liberty Biberty), the tiny bottle from Synnove. I'm loving being able to bring these little treasures out of boxes and into the light of day as this house slowly becomes 'lived in'. 

***********************

The post with information on how I made the old fashioned toilet from a modern one is here - it's as easy as 1 2 3!

Friday, December 13, 2013

Salon mirror


This mirror proves the old adage "keep a thing long enough and you'll find a use for it". It's been in my stash for 30+ years and cost 29c - I know that because the price sticker was still on the back. It was made as a handbag mirror but I bought it because I thought it might come in useful as a dollhouse dressing table mirror but it has lain unused for all these years - until now! 

It was an exciting moment when I realised that the mirror and the angels embellishment would fit above the fireplace - it wasn't planned, it's just 'dumb luck', or maybe serendipity.  

Thursday, December 5, 2013

A mini birthday

It was my birthday yesterday. The highlight was lunch at Perons in Double Bay with my wonderful daughters-in-law and grandkids.

As well as little treasures of the human kind my day involved little treasures of the dollhouse kind, specifically Carrie Lavender's Lady Carlyle jug and the tiny roses compact, pictured on the left below (images from Carrie's Etsy, published with her kind permission) ...

... and Mini-ologie magazine which is a feast of inspiration and delight - although it does seem a little weird to be looking at images of a winter Christmas when it's full-on summer here! Click here for their website.  I'm enjoying perusing the digital download for the moment while waiting (with excited anticipation) for the paper copy to arrive. 


Well, that's three posts in four days! Definitely a record for me! Thanks for all your nice comments about the marbling and the chaise, I haven't had a chance to respond to most of them yet but they are all greatly appreciated.


Tuesday, December 3, 2013

Two little projects: marbling and a cardboard chaise


I looked at a few images of marble on Google to get the idea of how marbling should look and here is the result on the salon fireplace mantle


If you've ever though of trying it just go for it! I started with a layer of black then sponged on 3 different shades of dark grey in patches (changed the colour by mixing increasing amounts of grey and white into the black I started out with).  For the 'veining' is used a slightly diluted light grey and a soft brush with very few bristles, twisting it a bit as I went and that's what created the various widths within of the lines. They I added some very fine lines of off white over the grey veins here and there. Be sure to continue the veins over the edge of the piece. It's not nearly as hard as it looks and if it doesn't turn out right the first time just paint over it and start again. 

When I was stuck in the apartment because of the ankle injury a few months ago I made this little chaise. 


Because I couldn't get down to the basement workshop to use wood and power tools I was stuck with just cardboard, specifically box board because I didn't have any matt board at the time and couldn't get out to shop. I forget exactly what I used for the back legs, a couple of bits of thin table legs I think but I'm not entirely sure. The roll in the chaise body and the cushion insert are balsa dowel. 

The biggest mistake I made was using a piece of scrap dress lining fabric for the upholstery, it's shiny, synthetic and wasn't nice to work with (not pliable enough) but it was the only bit of green that I had and that's the colour I wanted. I'd never use that type of fabric again, no matter how much I thought I wanted a particular colour. Green was my colour of choice because I was thinking of putting it in the salon and thought that it might be nice if a piece of furniture in there echoed the green in the kitchen since both are on the same level but after all that trouble I have now decided it's going the Brocante

That's it for today :)  Next to come are the salon mirror and something on the bathroom but don't expect it too soon - two posts in two days is one thing - three in three is something entirely different! 

Monday, December 2, 2013

Additions to the roombox

I was really shocked a couple of days ago when I looked at the date of the last post!  How quickly time flies!  I have done a few little things which I'll post about in the coming days but I wanted to let you see these little additions to the nursery roombox first.  

Thanks to those of you who made suggestions about filling the empty space on the back wall. In the end I decided on a copy of the bus roll type canvas my daughter-in-law had made which records our little girl's birth details.  (For privacy purposes some of the info has been air-brused out in this picture).  The original canvas is a much brighter pink, I had to alter the colouring because it just didn't fit in here, the colour is also a bit lighter and softer than it looks in this picture and blends in better. 


Sorry I forgot to take the photo before I put the plastic front on - hence the reflections.

The other addition is the tiny silver baby cup that was gifted to me by Synnove way back in June 2010 as part of a swap we did.  I had some trouble locating it in my boxes and boxes of treasures so I was absolutely delighted when I found it again after taking the photos for the previous post.  


Synnove isn't active on her blog these days but it's still well worth a visit. She has the most delightful and inspiring French house that you're sure to love - click here to take a peek. 

I promise I'll be back soon to share a few things I've been working on and give you an update on the French apartment.  

Sunday, August 11, 2013

The nursery project (almost) completed

At last I can share with you the little nursery project I've been working on to celebrate the birth of our first granddaughter.  It took me much longer than expected due at least in part to an ankle injury that severely hampered my movements for several weeks.  (Back on my feet just in time to go back to work - not the most exciting mid-year vacation time since I hardly left the apartment for 4 weeks!)


The 'crowning glory' of this scene is the beautiful baby shawl that Susan gave me especially to include here, note the tiny rosebuds on each corner.  Susan's talent with yarn and hook always astounds me, as does her generosity.  Thank you Susan!! The cushion was part of my 2011 Christmas gift from my daughter-in-law Lamina, it's been waiting for the right home and I'm sure she will agree that this is the perfect place for it.


Another piece of Susan's lovely work that I've included is the pink and blue blanket that I won in her giveaway some time ago.  The angel is by my cousin Lillian in England. The basket is by Glenda (originally grey, painted cream to blend in with the colour palette).  Glenda has moved on from minis these days but although she might be 'gone' she's definitely not forgotten!  I bought the paper roses ages ago in an art supplies store, I'd almost forgotten I had them in my stash. (Note to self - dig out those boxes and remind yourself what treasures you have hidden away!)  

  
The 'jumping-off point' for the whole project was the Beatrix Potter 'Time for Tea' plate by Carrie (click here for her Etsy). I'd been casting around in my mind for several weeks for that little spark of inspiration that all else would flow from - as soon as I saw the plate the rest of it, including the colour palette, just fell into place.  The tiny Mother Goose book  is also by Carrie. I made the vintage style blocks from a printie I found online.  The letters H B P are our little girl's initials.


The incredibly tiny shoettes are also by Susan, aren't they delightful?! The rosebud embellishment is unbelievably small.  (Books by me, pram from my stash.)  


The picture on the box top in the bottom shelf is a copy of a treasured photo of my mother's toys taken and hand-coloured about 1920.  I originally made the little faceless doll to sit on the child's bed in the 1:16 house, she now has a new dress and a new home. 


I think the back wall needs something above the chair to balance up the bookshelf but I'm waiting for the right inspiration.  There is a clear plastic front that's yet to be installed (to keep out dust and little fingers) but the back is removeable so it'll be easy enough to add to it as time goes by.  


The new owner...


Friday, June 21, 2013

French chair makovers

I've been playing with a couple of chairs, this is the result...


They started out like this...


On the whole I'm pleased with the result but one thing I would do next time is choose a finer cotton to print the upholstery on because it was difficult to get a nice smooth edge on the medallion shapes for the backs.  To get a slightly dirty look I put the new fabric on top of the original, some of the colour shows through giving a hint of grubbiness created over time.  Also the fabric used for printing is an off-white 'natural linen' shade. 

I was considering putting them in the salon instead of the sofa (see previous post) but they look a little too big in this tiny space so they are most likely destined for the ground floor Brocante.   

It's been difficult to get motivated enough to go down into my basement to work on the French apartment, it's winter here now so it's a bit chilly down there!  Playing with these chairs (and a 'secret' nursery themed project for my brand new granddaughter) in the warmth and comfort of my living room has been a much more attractive option.  I hope to have pics of the nursery vignette to share with you soon, it's very close to finished. 

Friday, April 26, 2013

'Le salon' is taking shape


Far from finished but beginning to develop its character. 

So far this room has involved a few makovers! 

The table was originally polished mahogony, nice in it's own way but the dark wood just isn't  suitable for this room. 

 The two major makeovers were
 the fireplace ...


... and the sofa


I've had the fireplace as well as the sofa and fabric for a long time.  When each was purchased I had no idea where I'd use them and certainly no expectation they'd all end up in the same room  but I think they all look quite happy here together.  The sofa isn't generally recognised as quintessentially French but a bit of research reveals the design is from the Napoleon III era. I think it suits this room quite well and will probably stay in spite of my initial plan to make something in Louis XVI style. 

The pretty pink hydrangeas are by Jody @ Peach Blossom Hill
 She has some in her Etsy store right now!


I've decided not to work on this room any further for the moment. I want to progress to the top floor and come back to this later when I have a better feel for just how I want it to be. That's not quite happening right now so onward and (literally) upward!  

Monday, April 15, 2013

French kitchen and dining reveal

At last!!  The light was bright but not direct sun this afternoon so at last I had the right conditions for a photo shoot, and a working internet connection to share the results - yipee!

There are still some small details (including lighting) to complete but this is pretty much how la cuisine and la salle a manger will look when completely finished. 

la cuisine


 la salle à manger


These two rooms are full of wonderful gifts and purchases from fabulous friends in the miniature blogging world, specifically:
 
Kitchen

Apron - Frederica
Canisters, white jug and tiny whisk - Carrie Lavender
Floral plates in kitchen and dining - Carolyn
Colourful French jug (top shelf) - Ana
Tiny plant in yellow pot - Mercedes
Tray - Rosanna Rolla - sorry Rosanna for turning it upside-down and not noticing!
 
The retro style fridge is by Dolls House Emporium (I think no longer available). It was originally a pale peppermint green, my thanks to my son who spray painted it for me - who would have thought that Warhammer paints would be so useful for a French kitchen!.  The badge is an old Frigidaire one found on the internet.
 
Dining
 
Basket - Lidi
Table - Mercedes
Cushion - Margaret
Cafe sign - Wanda
Vintage French postcards, mail and pretty box on the floor beside the table - Linda Carswell
Chair made by me but inspiration and pattern by  Lea Frisoni
 
Many thanks to all of the above miniaturists for their special contribution to this project, and to miniature bloggers everywhere for your constant inspiration with special thanks to Lea Frisoni, the Queen of Miniature Shabby French.  


Monday, March 25, 2013

Eduard's new 'old' leather chair

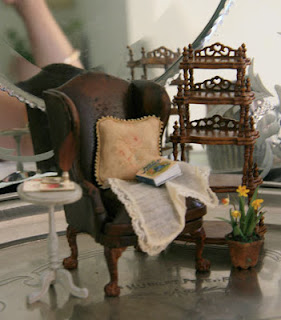
I recently bought this gorgeous aged leather chair from Margaret of My Petite Parterre.  

Photo from Margaret's Etsy shop 'Argus Minis'

I've always been a great fan of Margaret's work so as soon as I saw it in her new Etsy shop  I simply couldn't resist purchasing it for Eduard Culat.  He seems to be thoroughly enjoying relaxing in it! 


Clearly Eduard is the kind of guy who likes to relax a lot, last time we saw him he was relaxing in the bathtub at Emily's ...


Eduard has given the beautiful pillows and very fine lace edged throw that came with the chair to Emily.  Currently there's quite a tussle going on as to just who should be keeping the aged mirror that Margaret included with the chair as a special gift for my having been her first customer.  I was so excited to see it because I've loved her mirrors since I saw this one on her blog some time ago.  In the comments section of that post she explains how to age the mirror itself,  if you are interested in trying it out click here.


Whether Eduard gets to keep the mirror for himself, or if it'll go into Emily's Brocante remains to be seen...

-----------------------------------------------------

PS  Presently demand for these chairs is exceeding supply but if you want one and she doesn't have any in stock Margaret will be pleased to take an order.   Click here to visit her Etsy shop, Argus Minis, and see some of the other lovely things she has including pretty cushions and a beautiful draped cradle. 

Monday, February 25, 2013

When is a French attic not an attic?

... when it's a book-box!!  


Before Christmas I spent quite a lot of time making this little French artist's attic in a fake book (which is really a storage box) as a Christmas gift for my artistic daughter-in-law Lamina.  It was very difficult to keep it a secret as we're usually chatting regularly about the projects we're working on.
Sketches by Lamina @ doabit.blogspot.com.au
The Tale of Mr Cat from inalux.blogspot.com.au, reproduced with kind permission, visit them to see his true beauty 


The life-drawing and landscape sketches are Lamina's own work, copied from her blog.  The wonderfully colourful cat is a mini-reproduction of one of Lamina's favourite art works 'The Tale of Mr Cat' by the incredibly talented artists at inaluxe - many thanks to Kristina and Jason for generously allowing me to copy this work for Lamina's mini studio - it wouldn't be the same without the contrasting style and colour it provides. It's impossible for me to do it justice here, visit them to see Mr Cat's true beauty and admire their other fabulous creations.
Other credits are due too - the pretty jug and flowers were made by Flora, the well-worn little canister by Mercedes,  the tiny angel was a gift from Synnove.  The graphic on the box of rags is from The Graphics Fairy

Much as I enjoyed making this tiny attic I'm still feeling inspired by Jean Jacques Brisson (see post dated December 3, 2012) and continue to dream about creating a larger version...

Wednesday, February 20, 2013

Summer holidays in New Zealand


During my blogging break I spent several weeks at our cottage in New Zealand

(click on the pics for a larger view)


doing this 


on walls


and furniture


When we visit again this chest of drawers needs a lot more attention, it was a case of 'slip, slop, slap' this time to make a quick improvement so that it's okay enough to be used.  (During our absence a young couple with be house-sitting.)

But it wasn't all work and no play.

A fun highlight was a visit to Akaroa,
a French settlement about 2 hours drive from Christchurch.


The main reason for taking the trip to Akaroa was to visit a 
French shop that my sister had told me I'd love 
La Folie Jolie
Alas to my great disappointment it was closed!!
I couldn't believe it.
The only day it's closed is Tuesday, the day we chose to visit.
Next time I'm going somewhere special I'll be sure to check their opening hours first!
(You can visit La Folie Jolie online here.)

As always the end of our holiday came all to soon.

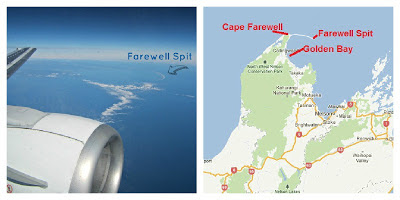
Flying over Farewell Spit (Tuhuroa), a narrow sand spit at the northern end of the South Island of New Zealand, en route to Auckland to catch our flight back to Sydney.